梁光静


  • Home

  • Archives

自己实现数组常用API

Posted on 2019-03-23

1. join

1
2
3
4
5
6
7
8
Array.prototype.join = function(char){
let result = this[0] || ''
let length = this.length
for(let i=1; i< length; i++){
result += char + this[i]
}
return result
}

2. slice

1
2
3
4
5
6
7
8
9
Array.prototype.slice = function(begin, end){
let result = []
begin = begin || 0
end = end || this.length
for(let i = begin; i< end; i++){
result.push(this[i])
}
return result
}

因此可以用 slice 来将伪数组,转化成数组

1
2
3
array = Array.prototye.slice.call(arrayLike)
或者
array = [].slice.call(arrayLike)

但是没必要,因为ES6有更好的方法

1
array = Array.from(arrayLike)

P.S. 伪数组与真数组的区别就是:伪数组的原型链中没有 Array.prototype,而真数组的原型链中有 Array.prototype。因此伪数组没有 pop、join 等属性。

3. sort

1
2
3
4
5
6
7
8
9
10
11
12
Array.prototype.sort = function(fn){
fn = fn || (a,b)=> a-b
let roundCount = this.length - 1 // 比较的轮数
for(let i = 0; i < roundCount; i++){
let minIndex = this[i]
for(let k = i+1; k < this.length; k++){
if( fn.call(null, this[k],this[i]) < 0 ){
[ this[i], this[k] ] = [ this[k], this[i] ]
}
}
}
}

4. forEach

1
2
3
4
5
6
7
Array.prototype.forEach = function(fn){
for(let i=0;i<this.length; i++){
if(i in this){
fn.call(undefined, this[i], i, this)
}
}
}

forEach 和 for 的区别主要有两个:

  • 1.forEach 没法 break
  • 2.forEach 用到了函数,所以每次迭代都会有一个新的函数作用域;而 for 循环只有一个作用域(著名前端面试题就是考察了这个)

    5. map

    1
    2
    3
    4
    5
    6
    7
    8
    9
    Array.prototype.map = function(fn){
    let result = []
    for(let i=0;i<this.length; i++){
    if(i in this) {
    result[i] = fn.call(undefined, this[i], i, this)
    }
    }
    return result
    }

map和forEach的区别就是map有返回值而forEach没有

6. filter

1
2
3
4
5
6
7
8
9
10
11
12
Array.prototype.filter = function(fn){
let result = []
let temp
for(let i=0;i<this.length; i++){
if(i in this) {
if(temp = fn.call(undefined, this[i], i, this) ){ // fn.call() 返回真值就 push 到返回值,没返回真值就不 push。
result.push(this[i])
}
}
}
return result
}

7. reduce

1
2
3
4
5
6
7
8
9
Array.prototype.reduce = function(fn, init){
let result = init
for(let i=0;i<this.length; i++){
if(i in this) {
result = fn.call(undefined, result, this[i], i, this)
}
}
return result
}
    1. reduce 实现 map
      1
      2
      3
      4
      5
      6
      array2 = array.map( (v) => v+1 )
      可以写成
      array2 = array.reduce( (result, v)=> {
      result.push(v + 1)
      return result
      }, [ ] )
    1. reduce 实现 filter
      1
      2
      3
      4
      5
      6
      array2 = array.filter( (v) => v % 2 === 0 )
      可以写成
      array2 = array.reduce( (result, v)=> {
      if(v % 2 === 0){ result.push(v) }
      return result
      }, [])

JavaScript实现各种选择算法

Posted on 2019-03-07

1.线性搜索(顺序搜索)

假设一个数组中有n个元素,最好的情况就是要寻找的特定值就是数组里的第一个元素,这样仅需要1次比较就可以。而最坏的情况是要寻找的特定值不在这个数组或者是数组里的最后一个元素,这就需要进行n次比较。

  • 实现方式
    1
    2
    3
    4
    5
    6
    7
    8
    9
    10
    11
    function linearSearch(arr, value) {
    for(let i = 0; i < arr.length; i++) {
    if(arr[i] === value) {
    return i
    }
    }
    return -1
    }

    let arr = [9, 1, -3, 4, 2, 7]
    let index = linearSearch(arr, 2)
线性搜索优化

现实中很多查找遵循2-8原则,查找也类似。即我们80%的场景下查找的其实只是全部数据种20%的数据。根据这个原则,我们在每次查找时把找到的元素向前移动一位,这样经过多次查找后,最常查询的数据会移动到最前面,顺序查找时更容易找到。

  • 实现方式
    1
    2
    3
    4
    5
    6
    7
    8
    9
    10
    11
    12
    13
    14
    function linearSearch(arr, value) {
    for(let i = 0; i < arr.length; i++) {
    if(arr[i] === value) {
    if(i > 0 ) {
    [arr[i-1], arr[i]] = [arr[i], arr[i-1]] //让第 i 项和第 i-1 项交换位置
    }
    return i
    }
    }
    return -1
    }

    let arr = [9, 1, -3, 4, 2, 7]
    let index = linearSearch(arr, 5)

自己实现简易版Promise

Posted on 2019-02-18
1
2
3
4
5
6
7
8
9
10
11
12
13
14
15
16
17
18
19
20
21
22
23
24
25
26
27
28
29
30
31
32
33
34
35
function Promise(fn){
var status = 'pending'
function successNotify(){
status = 'resolved'
toDoThen.apply(undefined, arguments)
}
function failNotify(){
status = 'rejected'
toDoThen.apply(undefined, arguments)
}
function toDoThen(){
setTimeout(()=>{ // 保证回调是异步执行的
if(status === 'resolved'){
for(let i =0; i< successArray.length;i ++) {
successArray[i].apply(undefined, arguments)
}
}else if(status === 'rejected'){
for(let i =0; i< failArray.length;i ++) {
failArray[i].apply(undefined, arguments)
}
}
})

}
var successArray = []
var failArray = []
fn.call(undefined, successNotify, failNotify)
return {
then: function(successFn, failFn){
successArray.push(successFn)
failArray.push(failFn)
return undefined // 简化
}
}
}

JavaScript实现各种排序算法

Posted on 2019-01-04

1.冒泡排序

实现方式
1
2
3
4
5
6
7
8
9
10
11
12
13
function bubleSort(arr) {
for(let i = 0; i < arr.length /*i代表轮数*/; i++) {
for(let j = 0; j < arr.length - i /*j代表当前轮选中的元素下标*/; j++) {
if(arr[j] > arr[j+1]) {
[ arr[j], arr[j+1] ] = [ arr[j+1], arr[j] ] /*交换元素*/
}
//console.log(arr)
}
}
}

var arr = [10, 34, 21, 47, 3, 28]
bubleSort(arr)
时间复杂度

时间复杂度(可以理解为排序的次数)计算: (n-1) + (n-2) + … + 1 = n*(1 + (n-1))/2,所以时间复杂度为 O(n^2)

2.选择排序

实现方式
1
2
3
4
5
6
7
8
9
10
11
12
13
14
function selectSort(arr) {
for(let min = i = 0; i < arr.length /*i代表轮数*/; i++) {
min = i
for(let j = i + 1; j < arr.length; j++) {
if(arr[min] > arr[j]) {
min = j
}
}
[ arr[i], arr[min] ] = [ arr[min], arr[i] ] //把每轮的第一个和当前轮的最小值交换位置
}
}

var arr = [10, 34, 21, 47, 3, 28]
sselectSort(arr)
时间复杂度

时间复杂度为 O(n^2)

3.插入排序

实现方式
1
2
3
4
5
6
7
8
9
10
11
12
13
14
 function insertSort(arr) {
for (let i = 1; i < arr.length; i++) {
for (let j = 0; j < i; j++) {
if (arr[i] < arr[j]) {
arr.splice(j, 0, arr[i])
arr.splice(i + 1, 1)
break
}
}
}
}

var arr = [10, 34, 21, 47, 3, 28]
insertSort(arr)
时间复杂度

时间复杂度为 O(n^2)

4.快速排序

实现方式
1
2
3
4
5
6
7
8
9
10
11
12
13
14
15
16
17
18
 function quickSort(arr) {
if(arr.length <= 1) {
return arr
}
let leftArr = []
let rightArr = []
for(let i = 1; i < arr.length; i++) {
if(arr[i] >= arr[0]) {
rightArr.push(arr[i])
} else {
leftArr.push(arr[i])
}
}
return quickSort(leftArr).concat(arr[0]).concat(quickSort(rightArr))
}

var arr = [10, 34, 21, 47, 3, 28]
quickSort(arr)
时间复杂度

时间复杂度为 O(nlogn)

Vue组件通信

Posted on 2018-09-16

Vue组件之间的通信主要归为如下形式:
父子组件之间的通信
任意两个组件之间的通信(父子组件通信,爷孙组件通信,兄弟组件通信)
最终的boss,Vuex-状态管理模式
由繁到简,我们可以首先探讨一下父子之间的通信

1.子组件想改父组件的
1
父组件传属性给子组件,子组件发事件给父组件,父组件再传属性给子组件,如此循环。


1
2
3
4
5
6
7
8
9
10
11
12
13
14
15
16
17
18
19
20
21
22
23
24
25
26
27
28
29
30
```
Vue.component('child', {
props: ['visible'],
template: `
<div>
我是儿子

<grand-child v-show="visible" @close="$emit('close')"></grand-child>
</div>
`
})
Vue.component('grandChild', {
template: `
<div>
我是孙子
<button @click="$emit('close')">关闭</button>
</div>
})
new Vue({
el: '#app',
data: {
message: '我是爷爷',
xxx: false,
},
methods: {
log() {
console.log('爷爷收到消息')
}
}
})

  • 情形二:孙子向上一层一层通知爷爷
    示例

    3.兄弟组件之间的通信

    想要在两个兄弟组件之间通信,需要一个中间的桥梁,那么在这里我们可以使用
    1
    2

    创建一个Vue对象

// bus.js
export default new Vue();

1
使用```$on```进行监听

import Bus from ‘../bus.js’;
export default {
ready() {
Bus.$on(‘loadSuccess’, text => {
this.show = true;
this.status = ‘loadSuccess’
if (text) {
this.text = text;
}
})
},
}

1
使用```$emit```触发事件

ajax({
url: Config.API_ADDRESS_ADD,
type: ‘post’,
dataType: ‘json’,
data: data
}).then((data)=>{
Bus.$emit(‘loadSuccess’, ‘添加成功!’);
}).catch((data)=> {
})
使用$once注册,触发之后即被销毁。 使用$off`解绑事件

以上就是Vue组件通信的几种形式,另外,当项目比较大,通信比较复杂时,我们可以考虑使用Vuex 。

VueRouter入门

Posted on 2018-09-14

1.简介

由于Vue在开发时对路由支持的不足,后来官方补充了vue-router插件,它在Vue的生态环境中非常重要,在实际开发中只要编写一个页面就会操作vue-router。要学习vue-router就要先知道这里的路由是什么?这里的路由并不是指我们平时所说的硬件路由器,这里的路由就是SPA(单页应用)的路径管理器。再通俗的说,vue-router就是我们WebApp的链接路径管理系统。
有的小伙伴会有疑虑,为什么我们不能像原来一样直接用

1
2
### 2.解读router/index.js文件
我们用vue-cli生产了我们的项目结构,你可以在src/router/index.js文件,这个文件就是路由的核心文件,我们先解读一下它。

import Vue from ‘vue’ //引入Vue
import Router from ‘vue-router’ //引入vue-router
import Hello from ‘@/components/Hello’ //引入根目录下的Hello.vue组件

Vue.use(Router) //Vue全局使用Router

export default new Router({
routes: [ //配置路由,这里是个数组
{ //每一个链接都是一个对象
path: ‘/‘, //链接路径
name: ‘Hello’, //路由名称,
component: Hello //对应的组件模板
}
]
})

1
2
3
4
5
### 3.增加一个Hi的路由和页面
对路由的核心文件熟悉后,我们试着增加一个路由配置,我们希望在地址栏输入 http://localhost:8080/#/hi 的时候出现一个新的页面,先来看一下我们希望得到的效果。
具体操作步骤如下:
- 在src/components目录下,新建 Hi.vue 文件。
- 编写文件内容,和我们之前讲过的一样,文件要包括三个部分```<template><script>和<style>```。文件很简单,只是打印一句话。


1
- 引入 Hi组件:我们在router/index.js文件的上边引入Hi组件 ```import Hi from '@/components/Hi'

  • 增加路由配置:在router/index.js文件的routes[]数组中,新增加一个对象,代码如下。
    1
    2
    3
    4
    5
    {
    path:'/hi',
    name:'Hi',
    component:Hi
    }

4.router-link制作导航

现在通过在地址栏改变字符串地址,已经可以实现页面内容的变化了。这并不满足需求,我们需要的是在页面上有个像样的导航链接,我们只要点击就可以实现页面内容的变化。制作链接需要

1
```<router-link to="/">[显示字段]</router-link>

1.改造App.vue的导航代码

App.vue代码,注意

1
2
3
4
5
6
7
8
9
10
11
12
13
14
15
16
17
18
19
20
21
22
23
24
25
26
27
28
29
30
31
32
```
<template>
<div id="app">
<img src="./assets/logo.png">
<p>导航 :
<router-link to="/">首页</router-link> |
<router-link to="/hi">Hi页面</router-link> |
<router-link to="/hi/hi1">-Hi页面1</router-link> |
<router-link to="/hi/hi2">-Hi页面2</router-link>
<router-link to="/hi1">Hi页面</router-link>
</p>
<router-view/>
</div>

</template>

<script>
export default {
name: "App"
};
</script>

<style>
#app {
font-family: "Avenir", Helvetica, Arial, sans-serif;
-webkit-font-smoothing: antialiased;
-moz-osx-font-smoothing: grayscale;
text-align: center;
color: #2c3e50;
margin-top: 60px;
}
</style>

2.改写components/Hi.vue页面

把Hi.vue改成一个通用的模板,加入标签,给子模板提供插入位置。“Hi页面1” 和 “Hi页面2” 都相当于“Hi页面”的子页面,有点想继承关系。我们在“Hi页面”里加入标签。

  • Hi1.vue

    1
    2
    3
    4
    5
    6
    7
    8
    9
    10
    11
    12
    13
    14
    15
    16
    17
    18
    <template>
    <div class="hello">
    <h1>{{ msg }}</h1>
    </div>
    </template>
    <script>
    export default {
    name: 'hi',
    data () {
    return {
    msg: 'Hi, I am Hi1!'
    }
    }
    }
    </script>
    <style scoped>

    </style>
  • Hi2.vue

    1
    2
    3
    4
    5
    6
    7
    8
    9
    10
    11
    12
    13
    14
    15
    16
    17
    <template>
    <div class="hello">
    <h1>{{ msg }}</h1>
    </div>
    </template>
    <script>
    export default {
    name: 'hi',
    data () {
    return {
    msg: 'Hi, I am Hi2'
    }
    }
    }
    </script>
    <style scoped>
    </style>

3.Hi.vue代码

注意新增的router-view

1
2
3
4
5
6
7
8
9
10
11
12
13
14
15
16
17
18
19
20
21
22
23
<template>
<div class="hello">
<h1>{{ msg }}</h1>
<router-view class="aaa"></router-view>
</div>

</template>

<script>
export default {
name: 'hi',
data () {
return {
msg: 'Hi, I am JSPang'
}
}
}
</script>


<style scoped>

</style>

4.修改router/index.js代码

我们现在导航有了,母模板和子模板也有了,只要改变我们的路由配置文件就可以了。子路由的写法是在原有的路由配置下加入children字段。

1
2
3
4
children:[
{path:'/',component:xxx},
{path:'xx',component:xxx},
]

children字段后边跟的是个数组,数组里和其他配置路由基本相同,需要配置path和component。具体看一下这个子路由的配置写法。

1
2
3
4
5
6
7
8
9
10
11
12
13
14
15
16
17
18
19
20
21
22
23
24
25
26
import Vue from 'vue'   
import Router from 'vue-router'
import Hello from '@/components/Hello'
import Hi from '@/components/Hi'
import Hi1 from '@/components/Hi1'
import Hi2 from '@/components/Hi2'

Vue.use(Router)

export default new Router({
routes: [
{
path: '/',
name: 'Hello',
component: Hello
},{
path:'/hi',
component:Hi,
children:[
{path:'/',component:Hi},
{path:'hi1',component:Hi1},
{path:'hi2',component:Hi2},
]
}
]
})

CSS进阶

Posted on 2018-09-11

1. 父亲儿子的上下margin合并

1
2
3
4
5
6
7
8
9
10
11
12
13
14
15
16
17
18
<head>
<style>
.child{
height: 100px;
border: 1px solid red;
margin-top: 100px;
}
.parent{
width: 100%;
background: green;
}
</style>
</head>
<body>
<div class="parent">
<div class="child"></div>
</div>
</body>

这样儿子的margin-top会给到父亲,把父亲挤下来,但只要在父亲里加:

  • border: 0.1px solid green;
  • padding: 0.1px
  • display: table;
  • display: flex;(不加width的话会把width变成0)
  • display: inline-block(不加width的话会把width变成0)

则上下margin不会合并,父亲还是会把儿子包起来

2. 对齐中文

1
2
3
4
5
6
7
8
9
10
11
12
13
14
15
16
17
18
19
20
21
22
<head>
<style>
span{
display: inline-block;
text-align: justify;
width: 5em;
overflow: hidden;
height: 20px;
border: 1px solid red;
}
span::after{
content: '';
display: inline-block;
width: 100%;
border: 1px solid blue;
}
</style>
</head>
<body>
<span>姓名</span> <br>
<span>联系方式</span>
</body>

3. 文字溢出变省略

  1. 显示一行

    1
    2
    3
    4
    5
    6
    7
    8
    9
    10
    11
    12
    13
    <style>
    div{
    border: 1px solid red;
    white-space: nowrap;
    overflow: hidden;
    text-overflow: ellipsis;
    }
    </style>
    <body>
    <div>
    只显示一行,超出一行的用省略号替代....
    </div>
    </body>
  2. 显示任意多少行(不兼容iE)

    1
    2
    3
    4
    5
    6
    7
    8
    9
    10
    11
    12
    13
    14
    <style>
    div{
    border: 1px solid red;
    display: -webkit-box; //-webkit不兼容IE
    -webkit-line-clamp: 1; //只显示1行
    -webkit-box-orient: vertical;
    overflow: hidden;
    }
    </style>
    <body>
    <div>
    文字文字文字....
    </div>
    </body>

4. 文字绝对居中

不要给div加height,直接用padding当作高度

1
2
3
4
5
6
7
8
9
10
11
12
13
14
<style>
div{
border: 1px solid red;
/* 写line-height,不要写height */
line-height: 24px; /* div高为line-height+2*padding */
padding: 8px 0; /* 垂直居中 */
text-align: center; /* 水平居中 */
}
</style>
<body>
<div>
文字文字文字....
</div>
</body>

5. 文档流

1. div高度
综1和4所述,div高度是由div内部文档流元素高度总和决定的,文档流中内联元素从左到右依次排列若空间不够则换行,文档流中块级元素从上到下依次排列

  1. 脱离文档流
  • float
  • position: absolute
  • position: fixed
  1. 相对定位(relative)
    position:relative不会脱离文档流,给相对定位的元素设置top和left,会相对它之前在的位置变化,但它之前占的位置会一直占在那,不会脱离文档流

6. div绝对居中

  1. parent没写height时

    1
    2
    3
    4
    5
    6
    7
    8
    9
    10
    11
    12
    13
    14
    15
    16
    17
    18
    19
    20
    <head>
    <style>
    .child{
    border: 1px solid red;
    margin: 0 auto; /* 水平居中 */
    width: 100px;
    }
    .parent{
    border: 1px solid green;
    padding: 100px 0; /* 垂直居中 */
    }
    </style>
    </head>
    <body>
    <div class="parent">
    <div class="child">
    asd asd
    </div>
    </div>
    </body>
  2. parent写了height(不兼容IE)

    1
    2
    3
    4
    5
    6
    7
    8
    9
    10
    11
    12
    13
    14
    15
    16
    17
    18
    19
    20
    21
    <head>
    <style>
    .child{
    border: 1px solid red;
    }
    .parent{
    border: 1px solid green;
    height: 100px;
    display: flex; /* 这三行搞定 */
    justify-content: center;
    align-items: center;
    }
    </style>
    </head>
    <body>
    <div class="parent">
    <div class="child">
    asd asd
    </div>
    </div>
    </body>

7. 内联元素的宽高

padding和margin只会影响内联元素的宽度,不影响高度。
内联元素的宽度由文字个数、padding、margin、border决定。
高度只由line-height:5;和font-size决定。
块级元素高度由内部文档流决定

8. 生成一个1:1的div(不写高度)

1
2
3
4
5
6
7
8
9
10
11
<head>
<style>
div{
border: 1px solid green;
padding-top: 100%; /* 这是高度,会随宽度变化自动变 */
}
</style>
</head>
<body>
<div class="parent"> </div>
</body>

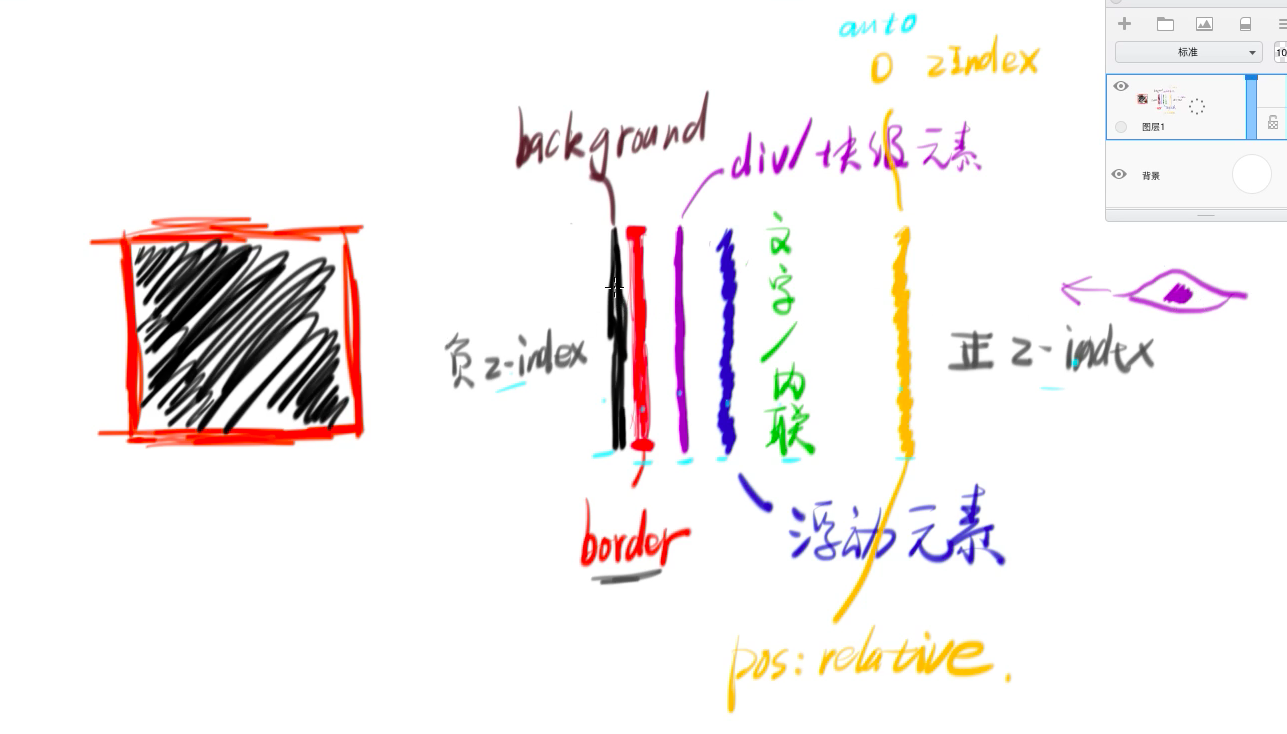
9. 层叠关系

堆叠顺序

10. 堆叠上下文

  • 根元素(HTML)
  • z-index值不为auto的 绝对/相对定位的元素就是堆叠上下文
  • position: fixed也是堆叠上下文
  • opacity: 0.5也是
  1. 堆叠上下文越后写的级别越高,级别高的堆叠上下文里的所有东西都可以压过级别底的里的所有东西。
  2. 在父亲是堆叠上下文中的儿子元素即使是z-index: -1;,在层叠关系里也会在父亲的border和background之上,不会沉下去

11. 响应式(基本没人用了)

  1. 媒体查询

    1
    2
    3
    4
    5
    6
    7
    8
    9
    10
    11
    12
    13
    14
    15
    16
    <style>
    /* 屏幕宽度为300px-325px时的css样式 */
    @media(min-width: 300px) and (max-width: 325px){
    body{
    background: red;
    }
    }

    /* 屏幕宽度小于450px时的css样式 */
    @media(max-width: 450px){
    body{
    background: black;
    }
    }
    /* 这样前面那个就没用了,被覆盖了 */
    </style>
  2. 一般不用第一个方法,直接引用一个手机版的css即可

    1
    <link rel="stylesheet" media="(max-width:768px)" href="mobile.css">

    在屏幕宽度小于768px时,就会渲染这个css,要把这个引用写在main.css之后,把main.css覆盖。
    并加上meta:vp

    1
    <meta name="viewport" content="width=device-width, user-scalable=no, initial-scale=1.0, maximum-scale=1.0, minimum-scale=1.0">

12. flex布局

flex布局

  1. container的属性

    1
    2
    3
    4
    5
    6
    7
    8
    9
    10
    11
    12
    13
    14
    15
    16
    17
    18
    19
    20
    21
    flex-direction: row;// (默认)所有内容排列在一行
    flex-direction: row-reverse; //反向排列在一行
    flex-direction: column; //所有内容排列在一列
    flex-direction: column-reverse; //反向

    flex-wrap: nowrap; //不换行(默认)
    flex-wrap: wrap; //自动换行

    flex-flow: row nowrap; //上面两个属性的简写

    //justify控制主轴
    justify-content: space-between; //这两个都是子元素在一行均匀分布
    justify-content: space-around;
    justify-content: flex-start; //子元素都往起点靠
    justify-content: flex-end; //子元素都往终点靠
    justify-content: center; //子元素居中

    //align控制子元素的侧轴
    align-items: stretch; //(默认)把同一行里的子元素的高度都伸展到同一行里最高那个元素
    align-items: center; //垂直居中
    align-items: flex-start; //往侧轴的起点靠
  2. item的属性

    1
    2
    3
    4
    5
    6
    7
    8
    9
    10
    11
    12
    13
    14
    15
    16
    17
    18
    19
    20
    21
    22
    23
    24
    //flex-grow,当一行空间没占满的时候
    .child:nth-child(1){
    flex-grow: 2;
    }
    .child:nth-child(2){
    flex-grow: 1;
    }
    //在同一行内把这两个元素按2比1的比例占满这一行

    //这三个元素的简写,后两个很少用
    flex: flex-grow flex-shrink flex-basis;

    //order(实现双飞翼)
    .child:nth-child(1){
    order: 2; //改变排列顺序,这个放在第二个
    }
    .child:nth-child(2){
    order: 1; //这个放在第一个
    }

    //align-self
    .child:nth-child(1){
    align-self: center; //第一个儿子在垂直方向居中
    }

13. 小技巧

对display:none到display:block的过程transition: all 1s;没用,可以改成visibility: hidden;和visibility: visible

14. bootstrap

  1. 安装
    下载css、js文件,js需要用jquery,所以要先引用jquery
  2. 栅格系统

    1
    2
    3
    4
    5
    6
    7
    8
    9
    10
    11
    12
    13
    14
    15
    16
    <div class=container>  //自动居中
    <div class=row> //一行分成12份
    <div class=col-md-1>1</div> //这两个分别占1份和11份
    <div class=col-md-11>11</div>
    </div>
    <div class=row> //第二行
    <div class="col-md-9 col-md-offset-3">9</div> //这样这个div会往右边对齐,因为第二个class代表往右偏3格
    </div>
    <div class=row> //第三行
    <div class="col-xs-6 col-md-1 col-sm-3">6</div>
    //在屏幕宽度很小的时候(手机)占6份
    //中等(电脑)的时候占1份
    //小(ipad)的时候占3份
    //超大屏(col-lg-12)
    </div>
    </div>
  3. 秘诀
    直接复制官网的html代码,复杂css组件,js组件,定制bootstrap可以自己改样式、颜色

  4. 小技巧
    靠右:不写col-md-...,直接写pull-right

  5. 主题
    下载的文件里有bootstrap.theme.css

15. IFC

  • font-size是刻字的时候的那个模版的大小
  • line-height是字所占的行高,但不同字体排在一起行高可能会变了,因为每个字体基线位置不同。而在一排要用基线对齐
  • vertical-top是元素实际占的高度的顶部对齐,所以img不写vertical-top的时候是以基线对齐的,下面会空出一点东西
  • 不要用inline-block布局了,用flex或float

let相关面试题

Posted on 2018-09-07

经典面试题

1
2
3
4
5
for ( var i=0; i<5; i++) {
setTimeout( function timer() {
console.log( i );
}, i*1000 );
}

这里因为 var会变量提升,所以实际上是下面这样子的

1
2
3
4
5
6
var i
for ( i=0; i<5; i++) {
setTimeout( function timer() {
console.log( i );
}, i*1000 );
}

这样一来循环一直都只有一个i,而setTimeout是个异步函数,所以会先所有会先把循环全部执行完毕,这时候 i 就是 5 了,而每次循环都会设置一个闹钟,闹钟执行时间分别是0s、1s、2s、3s、4s、5s,每一个闹钟的i都是最终的i,也就是i等于5,所以这题最终结果是输出5个5。

  • 解决办法有三种
  1. 使用闭包

    1
    2
    3
    4
    5
    6
    7
    8
    for (var i = 0; i < 5; i++) {
    (function(j) {
    setTimeout(function timer() {
    console.log(j);
    }, j * 1000);
    })(i);
    }
    `
  2. 使用 setTimeout 的第三个参数

    1
    2
    3
    4
    5
    for ( var i=0; i<5; i++) {
    setTimeout( function timer(j) {
    console.log( j );
    }, i*1000, i);
    }
  3. 使用 let 定义 i

    1
    2
    3
    4
    5
    for ( let i=0; i<5; i++) {
    setTimeout( function timer() {
    console.log( i );
    }, i*1000 );
    }

以上三种方法都能解决因为var变量提升而引起的误解,所以最终结果都是0s输出0,1s输出1,2s输出2,3s输出3,4s输出4,5s输出5。

canvas入门

Posted on 2018-09-05
  1. 1
    2
    3
    4
    5
    6
    7
    8
    9
    10
    11
    12
    13
    14
    15
    16
    17
    18
    19
    20
    21
    22
    23
    24
    25
    26
    27
    28
    29
    30
    31
    32
    33
    34
    //获取canvas标签
    var canvas = document.querySelector("#canvas");

    //初始化
    var context = canvas.getContext('2d');

    //画线
    function drawLine(x1,y1,x2,y2) {
    context.beginPath();
    context.moveTo(x1-0,y1+29); //起点
    context.lineWidth = 5; //线的粗细
    context.lineTo(x2-0,y2+29); //终点
    context.stroke(); //将各个点练成线
    }

    //画三角形
    function drawLine(x1,y1,x2,y2) {
    context.beginPath();
    context.moveTo(x1,y1); //起点
    context.lineTo(x2,y2); //第二个点
    context.lineTo(x3,y3); //第三个点
    context.stroke(); //将各个点练成线
    context.closePath(); //自动将第一个点和最后一个点连起来
    }
    //画圆圈
    function drawTriangle(x,y,r) {
    context.beginPath();
    context.arc(x-0,y+29,r,0,Math.PI*2); //left,top,半径, 起点(以原点为圆心从第一象限的x轴开始往y轴负方向画圈),终点
    context.fill(); //将圆圈填色
    }

    context.strokeStyle = 'black'; //线的颜色
    context.fillStyle = 'black'; //圆圈填充的颜色
    context.clearRect(x,y,30,30); //橡皮擦功能

arc的参数自己试

  1. 1
    2
    3
    4
    5
    6
    7
    8
    function setCanvasSize() {
    //获取用户界面的宽高
    var pageWidth = document.documentElement.clientWidth;
    var pageHeight = document.documentElement.clientHeight;
    //赋给画板
    canvas.width = pageWidth;
    canvas.height = pageHeight;
    }
  2. 1
    2
    3
    4
    5
    6
    7
    8
    9
    10
    11
    12
    //触屏设备
    canvas.ontouchstart = function(ev){
    var x = ev.touches[0].clientX; //获取点击的位置
    var y = ev.touches[0].clientY;
    } //监听手指点击事件
    canvas.ontouchmove = function(){} //监听手指移动事件

    //非触屏设备
    canvas.onmousedown = function(ev){}
    canvas.onmousemove = function (ev) {}
    canvas.onmouseup = function () {}
    canvas.onmouseout = function () {}

闭包

Posted on 2018-09-02

闭包

什么是闭包

1
2
3
4
5
6
7
function 函数(){
var 变量 = 1;
function 内部函数(){
console.log(变量);
}
return 内部函数;
}

上面的例子中

  • 内部函数 + 变量(内部函数能访问到这个变量) = 闭包
  • return 内部函数只是为了能使用到这个内部函数 , 也就是能使用闭包
  • 函数套函数是为了隐藏一个变量 或者说这就是闭包的作用

闭包的作用

1
2
3
4
5
6
7
8
9
10
11
12
13
14
15
16
17
18
function create()
{
var n=999;
return {
set : function(aaa){
n = aaa;
},
get : function(){
return n;
}
}
}

var a = create();
var b = create();
a.set(2);
console.log(a.get());
console.log(b.get());
  • 闭包的作用就是间接的访问一个变量 ,隐藏一个变量
  • 去掉那个外层函数 变量就会很容易被直接使用并且修改
  • n 是一个局部变量 ,在函数外面是使用不到这个变量的
  • 这时候get 和 set 函数就是 用来间接访问这个变量的访问器
  • 闭包和变量的作用域有关

在我们写js代码的时候会很容易就出现闭包, 而不是我们经常有意的去创造闭包
引用维基百科:闭包(Closure)是词法闭包(Lexical Closure)的简称,是引用了自由变量的函数。这个被引用的自由变量将和这个函数一同存在,即使已经离开了创造它的环境也不例外。

12…4

梁光静

36 posts
10 tags
© 2019 梁光静
Powered by Hexo
|
Theme — NexT.Muse v5.1.4